|
The Buildings
home | the buildings | power station (305)
Power Station (305)
Built: 1951
Decommissioned: 1993?
As the scientists and engineers started desiging the new Pyestock, the site's appetite
for electrical power was obviously foremost in their minds. A 45MW feed (at 33kV) was available from
the Weybourne Lane substation, but there were concerns about the stability of this load during peak hours.
Therefore, one of the first buildings designed and built was the Power Station. It would provide electricity
for the establishment to bolster the existing supply and, as the generating equipment was itself a turbine,
allow further experimentation and investigation. The Power Station was effectively another of
Pyestock's gas turbine testing cells.
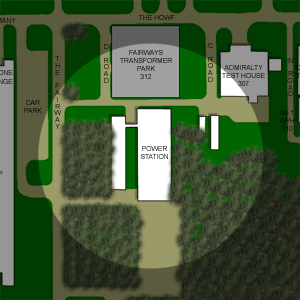
It was sheer testament to the scale of Pyestock and the size of the other buildings, that its
Power Station was not a dramatic, obvious structure. A visitor driving up the tree lined
The Fairway could have missed this foreboding blockhouse as it was screened by mature trees
(a thoughtful leftover from the Bramshot Golf Course). As the trees gave way to the Fairway Transformer Park,
the visitor would have observed three huge buildings forming its perimeter: the Power Station,
Admiralty Test House and the
Battle Test House. The Power Station was not a small structure,
but given the huge size of its neighbours, it was perfectly in keeping and wasn�t conspicuous.
|
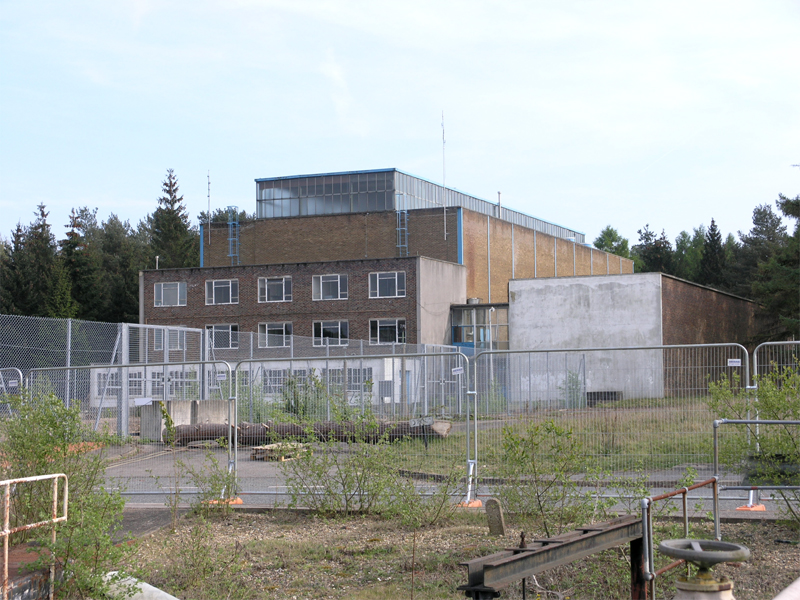
The stepped northern appearance of the Power Station as seen
from the front of the Battle Test House.
21|04|07 © Simon Cornwell 2007
|
However, it had a more noticeable architectural flair than its rectangular,
blocky neighbours. The front of the building resembled a sequence of steps: the lowly
drawing office jumping up to the glass-fronted offices, again leaping to the full height
of the turbine hall and the loading bay with its glass skylight (an architectural feature matched
by the later Cell 4). Whilst the main part of the building was of
brick steel frame construction, a brick built annex on its west side gave the symmetrical building
an odd appendage, the two linked by a glass-enclosed walkway.
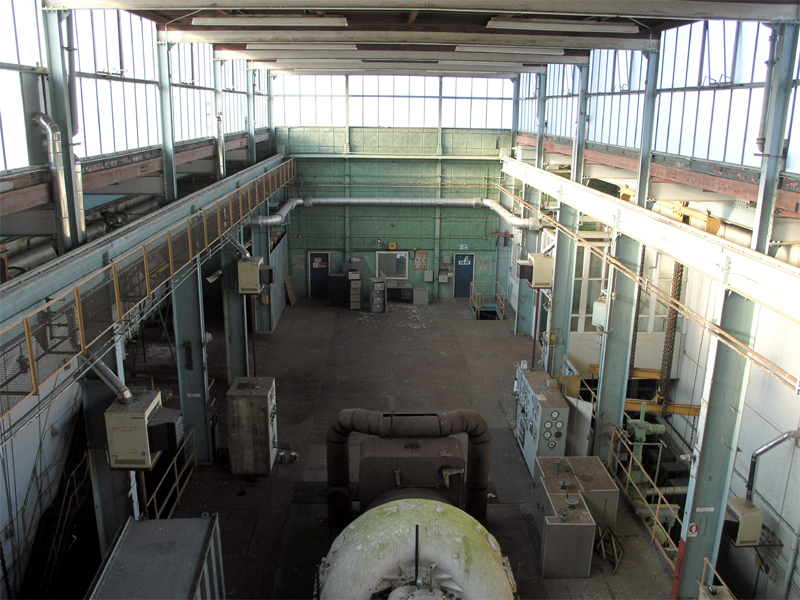
Internally, the building was dominated by its turbine hall. A crane on runners allowed equipment
to be installed and removed with ease, the large components being dropped off in the loading
bay, with large doors situated to the west. The north of the building was fronted by two
stories of offices, whilst the brick annex housed cable connections and switchgear on its
lower floor, with a battery room, more switchgear and various transformers above.
|
The turbine hall, looking north, from the crane gantry. The Parsons generator can
just be seen in the bottom of the frame, occupying the position of the HP generator. The space further along
the turbine hall was for the LP generator.
31|03|07 © Simon Cornwell 2007
|
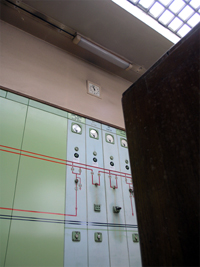
Despite its 1950s utilitarian nature, some modernistic architectural flair could be found
within the building. The upper level office corridor featured distinctive circular skylights,
leading the way down to a mezzanine floor. This lead to the glass enclosed walkway between the
Power Station main building and its annex and in turn lead into the control room.
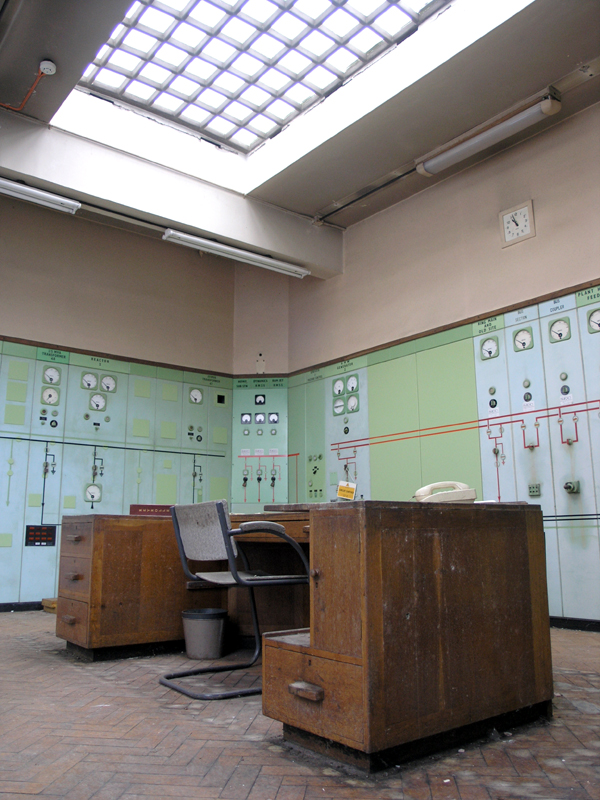
Unlike many of the control rooms at Pyestock, it was never altered and retained all
its original 1950s features: a Ken Adam's style segmented and curved skylight,
bisected octagonal green control panels, single wooden desk, complete with herringbone parquet
hardwood floor. Walking from the futuristic corridor down into the impressive control room was
like entering a Bondian liar. With the offices now stripped and empty, the drawers in this lone
desk yielded delights, such as the original schematics, neatly folded and sensibility filed away.
|
The power station control room looking south west.
23|05|07 © Simon Cornwell 2007
|
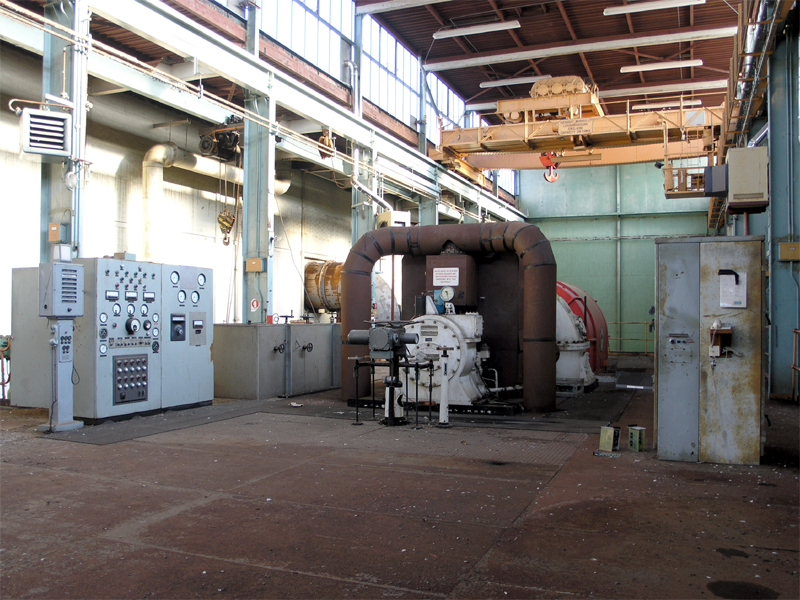
Whilst some of the building retained its original features, others were long gone. The original plant,
a 10MW Gas Turbine Generator set by Parsons, was probably the site's first guinea pig gas turbine (and
generating electricity as a fortuitous byproduct). Removed after several years service, the Parsons
was replaced by a 12.75MW Steam Turbine Alternator from Bellis & Morcombe, powered by steam from the
Battle Test House. Whilst the heavy plant often changed, other equipment
in the turbine hall remained in-situ including the AEI control panel (dating from 1960-1967) and
the amazing Ordasign control illuminated panel which resembled a ship�s telemotor.
|
The first floor of the turbine hall looking south. The back of the Parsons generator can be
clearly seen, along with the crane gantry positioned over the loading bay beyond. To the left is the classic
'telemotor' style illuminated control panel.
31|03|07 © Simon Cornwell 2007
|
As Pyestock grew, the contribution provided by the Power Station became less
significant, but was still utilized. A 132MW supply was taken from the Pondtail, Fleet substation, primarily
to supply additional power for the Air House and
Cell 3, but the Power Station was still connected to the ring main,
as evidented by dials and warning lights in the
Air House control room. But it was only a fractional top-up,
and in the early 1970s, Pyestock had to negotiate with the CEGB when
Cell 4 was powered up.
If reliant on steam, the Power Station would've been mothballed when the
Battle Test House closed in 1993, the latter's steam boilers no longer
economic to repair. Despite the omnipotent pigeons who took over the turbine hall, and ignored the
incessant rattling of the loose steel roof, the Power Station is little unchanged since its
construction, and provided a tiny glimpse of how Pyestock looked in the early 1950s.
Power Station Walkthrough...
Further Reading
|